Linking a New Amazon Account or Marketplace to Your m19 account
How to Display a New Marketplace in Your m19 Account: Step-by-Step Guide
Adding an account for the first time to m19
- Access your m19 dashboard.
- Click on any of these 2 buttons " Link your Amazon accounts".

- Click on "Login with Amazon".

- Click on 'Allow' to grant m19 permission to access your list of linked Amazon accounts associated with your email.

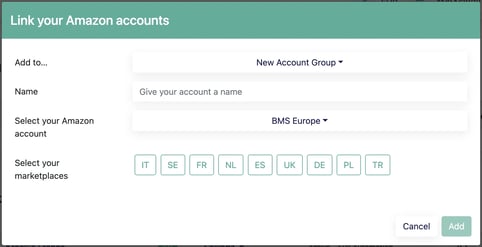
- Choose the account group where you wish to include the new account. Please note that vendor and seller accounts cannot belong to the same account group. Alternatively, you can create a new account group and name it accordingly.

- Select the marketplace or marketplaces you want to include, then click on the 'Add' button.
Add an additional Amazon account/marketplace to m19
To add a new Amazon account or marketplace, follow these steps:
- Access your m19 dashboard
- Navigate to the Settings section and select 'Accounts'

- Click on 'Add Accounts' situated on the lower left-hand side of the page

- Click on "Login with Amazon".

- Click on 'Allow' to grant m19 permission to access your list of linked Amazon accounts associated with your email.

- Choose the account group where you wish to include the new account. Please note that vendor and seller accounts cannot belong to the same account group. Alternatively, you can create a new account group and name it accordingly.

- Select the marketplace(s) you want to include, then click the 'Add' button.
Congratulations! You have successfully linked your new Amazon account to your m19 dashboard.
![m19-transparent.png]](https://help.m19.com/hs-fs/hubfs/m19-transparent.png?height=50&name=m19-transparent.png)